Pages

September 29, 2012

Embossed Warli Painting -1

Made an embossed warli painting recently and was waiting for it to get framed. So it finally reached my hands yesterday night and here it is for your eyes :-) Its my first attempt using embossing method. Idea borrowed from a craft programme telecasted on a TV show very long back. Remembered it one day so decided to try.


Embossed not in metal but in paper. Yes it is easy to make.

You will need :-

  1. Catridge (paper to paint)
  2. Fabric glue
  3. Acrylic colours (Black, burnt sienna, brown)
  4. Gold colour
  5. Thin brush
  6. Flat brush
  7. Toothpick
Procedure :-

  • On the catridge, draw any warli design of your choice. In this painting I drew a tree, birds, people watering the tree.
  • Fill the figures with fabric glue. For the tree bark effect, once the glue is semi dry, using a toothpick scratch the tree to get the bark texture. Let it dry for a day.


First apply a coat of diluted burnt sienna all over using up & down strokes only. No horizontal or criss cross strokes. Use a flat brush for this purpose. Hope the picture below will give you an idea of how it is done.


  • Over this using brown colour - dry brush stroke, apply on the edges downwards, this will give a dark edge and bright centre. Let it dry.
  • Using black colour & thin brush, make edgings in the tree where you need highlight
  • Using gold paint, paint the embossed figure leaving the black highlight. Let it dry and then get it framed.


September 22, 2012

Tilak Nagar Ganapati, Sept 2012

Yesterday we travelled 50km one way to attend a house warming ceremony. We were travelling home bound by 11.30 p.m. when Ganapati Bapa blessed me by drawing towards the celebrations happening on the Community Hall of Tilak Nagar, Chembur. 


Flower decoration which caught my attention :-


A fairy tale Chariot model at the entrance which gives a quick idea of how the amusement world is going to be inside the mandap. Children looked cheerful seeing this chariot and the fairy tale house like structure made covering the community hall of tilak nagar and making them more excited to see their favourite characters coming live inside.......


I never ever imagined that I could get a nice darshan of the Lord there.  Tilak Nagar Ganapati is one of the Mumbai's famous ganapati mandal aka Maharashtra Ganapati of Shiv Sena. The Lord is seated majestically in an airconditioned mandap surrounded by whole lot of cartoon characters. 

After crossing the main entrance to the mandap here is how the path looks like..... Bees welcoming the cheerful children and adults.


Yes, this year's festival is known as 'sahyadri' and the theme is 'sahyadri Kid's world'. So there were lot of children who also patiently stood in the queue along with their parents all through the night to catch a glimpse of their favourite fantasy characters and Lord Ganapati. The queue was huge. Luckily with the help of a known face who is also a member of the mandal i could by pass and enter the middle of the queue (isn't ganapati bapa so loving making it easy for me to have a quick darshan of him?)

Lion King


Mermaid & sea horses, Penguins with waterfall in the background


Chota Bheem....


The famous Doraemon


A fariy tale model


Wait makes sweet things even more sugary. So here is our famous & majestic Tilak Nagar Ganapati Bapa.


Due to the weekend rush, there was a typical chaos which you commonly see in big temples. The Police & Security personnel were more into crowd management and shouting 'Pude chalo' in Marathi like the Tirupati 'Jarugu'

So with a content heart happily started our homebound journey ............

Ganapati Bapa moriya, Mangal Murti Moriya!

September 20, 2012

Chaturti Celebrations 19th Sept 2012

This year the celebration was not elaborate. Kept the pooja simple & offerings simple as we had plans to visit some famous ganapatis in our city. This time placed my Cold Porcelain Ganapati with Popsicle Umbrella made by me for pooja.

Offered beetel leaf, nuts, turmeric, fruits, mix fruit + flattened rice flakes, milk kheer and mahaprashad (rice + jagger).


We started after the pooja but could not see the famous ganapatis because they were open to public only after 7.30 pm as final touch of decorations were going on. So on invitation from a friend, we went to their place to attend the pooja for the Ganapati installed in their complex. It was very interesting to see the decorations made for ganapati at various homes.

Ganapati is seated in his chariot drawn by 7 mooshiks lead by the chief fat & big Mooshik.


Though we could not have the darshan of famous ganapatis, our heart is fulfilled with joy that we could take part and have darshan of this ganapati. Took the prashad and we started our return journey towards home sweet home seeing Ganapti of different sizes, postures were taken in procession on the road.

May the vignaharta remove all obstacles and bless you all with a happy & prosperous life.

Ganapati Bapa Moriya, Mangal Murti Moriya!

September 11, 2012

Ganapati - Cold Porcelain craft

Om Maha Ganapathaye nama :
 
Inspired by cold porcelain works, I tried making the clay at home.

I tried many doll tutorials given in the net but didn't turn out satisfactorily. So tried my favourite Ganeshji. A god who is very simple and his form is so easy to draw or mould.

To make cold porcelain clay at home check this beautiful website. I followed stove stop method.

The idea for the idol I got from this wonderful link

The umbrella making tutorial you can check out here 

  1. Popsicle Umbrella
  2. Umbrella for Ganeshji 


I used an empty deo bottle's cap to seat my Ganeshji and formed the lotus around it.


then the mooshik who will be seen always with Ganapati Bapa


colour using acrylic pearl colours (this gives a shine)


 Ganapati Bapa Moriya, Mangal Murti Moriya


September 10, 2012

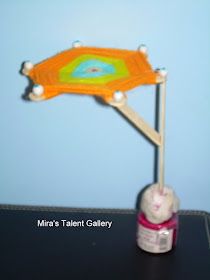
Popsicle Umbrella for my Ganpati

Sharing with you another fun popsicle project. An Umbrella.


You will need :

  1. Popsicle sticks - 5 Nos
  2. Yarns of different colours
  3. Glue gun
  4. thermocol balls / beads
  5. Clay
  6. Empty colour bottle
  7. Acrylic Colours
Procedure :-


Arrange 3 sticks as show in the picture below to form the top part of the umbrella


Make the stick support for the umbrella by joining two sticks as shown in the picture


now when the 3 sticks you have arranged earlier has dried up, tie the yarn and wind it around the stick and take it to the next stick, wind around it...so on. the pictures that follows may give you an idea.


Now using glue gun, attach the top portion to the stick. decorate with beads / thermocol balls


Stuff some clay inside an empty colour bottle. Place the stick and cover the bottle with clay by rolling out it using a rolling pin after dusting the surface with talcom powder.


let the clay dry for 2 or 3 days. Then colour it.


Now a beautiful umbrella is ready.

I made it for my ganpati bapa for this chathurthi. ....will be making a post on it soon.


September 9, 2012

Potato Podimas / Potato curry

A traditional recipe for the potato lovers. A dry subzi goes well with sambar rice or curd rice.


Ingredients :-

  1. Potato - 4 medium
  2. Grated coconut - 4 tbsp
  3. Green chillies - 3 nos
  4. Ginger - 1/2" piece
  5. Salt to taste
  6. Oil for tempering
  7. Mustard seeds
  8. Urad whole
  9. Curry leaves
  10. Asafoetida powder - 1 pinch
 Procedure :-

  • Pressure cook potatoes for 3 whistles. Cool and peel the skin. Gently mash it into rough medium pieces 
  • Dry grind the grated coconut, green chillies without water.
  • Heat oil, add mustard seeds. When it starts spluttering, add whole urad, curry leaves, hing powder. 
  • When urad turns golden brown, add the potato pieces and ground coconut masala, salt 
  • Cover and cook for two minutes by stirring in between.
  • Yummy potato curry / Podimas ready
In this traditional recipe, i used coconut oil which is more flavourful. 

PS : You can also squeeze in few drops of lemon before serving which adds to the flavour & taste and make it more yummy.

September 6, 2012

Banana Chips (nendran kaai varathadu)

Crispy Chips always give you a good company whether you chat or watching your favourite programme in TV.  An all time favourite to one and all.

Made some crispy chips using raw banana (nendran variety) - big kela.

The speciaility of this chip is it is made using a special banana called 'nendran' (big kela), bright yellow in colour and fried in coconut oil which makes it even more attractive, flavourful & tasty which makes you crave for more, more and more...........


Ingredients :
  1. Raw banana - 4 nos
  2. Water - 1/4 cup
  3. Salt - 1.5 tsp
  4. Turmeric Powder - 1/2 tsp
  5. Oil for frying
Procedure :-
  • Wash and pat dry the banana. Peel (preserve this as we can make a nice & yummy dry subzi / Thoran out of it)

  • Dissolve Turmeric Powder and Salt in 1/4 cup water

  • Make thin round slices using a chips grater. the pieces will stick to each other. separate them and keep 10 - 15 pieces ready for each batch to fry or you can put them in water, then drain, spread on a clean kitchen towel, let it dry and then fry them.
  • Heat coconut oil (don;t take it to smoking point)
  • spread kitchen towel or newspaper into a basin & keep ready
  • Keep in medium flame & deep fry the grated bananas when they turn 1/2 crisp, sprinkle some turmeric water into it and fry till water evaporates completely & chips becomes crisp and put them over the kitchen towel for the excess oil to get absorbed into the towel.
  • Yummy banana chips is ready! Store it in an air tight container by spreading a piece of paper at the bottom.
Now sit back, relax and enjoy the crispy chips that melts into your mouth :D


September 2, 2012

Umbrella for my Ganesha (recycle craft)

Got so bored staying away from system.....so engaged myself in a small project. A nice umbrella

Another DIY project.....it may sound complicated at certain point but it is easy if you have a glue gun. Glue gun makes the project very easy.

After reading about glue gun my search started and it went for months n months........... finally got it in hypercity and here is my first project using glue gun.

My gift for my favourite deity for his birthday


You will need :-

  1. carton box (I used the one in which Vanish stain remover comes)
  2. Glue Gun
  3. Corn pith (comes with kulfi)- 1No.
  4. Tooth pick - 2 nos.
  5. Metal Bangle - 1 No.
  6. Thermocol piece to support the stick
  7. Some Zari or lace
  8.  colours & glitters to colour your umbrella
  9. Thermocol balls - few (I had saved some after using for an occasion)
  10. Scissor, Pencil
Procedure :- 

  • Wind a lace to cover the bangle (I crocheted SCs around it using glitter thread)
  • Cut a piece of round shape out of the cardboard or carton box 
 
  • Cut little less than a quarter of the circle as shown in the picture.

  • Apply glue to one end and stick the other one overlapping that slightly.
 
 
  •  Allow it to set completely say for a minute
  • Then colour it with your favourite colours. I first painted it with white acrylic colour, then mixed some glitter powder into some glue and applied it. over that I used some glass colours I had & made a simple design. You can use kundan stones, chamkis.
  • Place the Zari or lace & stick it all around as shown in the picture using glue gun (as it dries fast)
  • Then using thermocol balls I decorated it

  •  I used corn pith as toothpick can be easily inserted into it. So I first pierced the toothpicks lightly then removed it, applied glue to the sharp end of the toothpick and fixed it in the hole made. Like that have to fix another toothpick too to give support to the top portion. As shown in the next two pictures. (this may sound complicated but easy to make)


  •  Now attach a thermocol piece the same way as we did for toothpick. Pierce, remove, apply glue and again set it in the hole made to make it sturdy.
  • stick the thermocol to the prepared bangle as shown in the picture. (I split one end of thermocol piece, applied glue and inserted the bangle lightly into it). To make it clear to you i have shown a plain bangle.


  •  I slipped the bangle stand around him, which you cannot see in the picture because of the satin ribbon work adorning him. so concealed. 
  • Here is my Ganesha under the shade........ getting geared up for his birthday isn't it?